How to Make a Kali Linux Bootable USB on Windows 10—Step-by-Step Guide
Quick TL;DR (if you want the short flow)
- Download Kali ISO from the official site. Kali Linux
- Verify SHA256 checksum (important!). Kali Linux
- Download Rufus (official) and prepare a 16GB+ USB. Rufus
- Use Rufus → Select ISO → Partition scheme (GPT for UEFI) → Write (ISO mode first).
- Boot the target PC from USB (disable Secure Boot if required). Kali Linux
- Choose Live (with persistence if made) or Graphical install to do a full install. Kali Linux
Why follow this guide & safety warning?
- Only download Kali from the official site—unofficial ISOs can contain malware. Kali Linux
- Always verify checksums/signatures—protects against tampered downloads. Kali Linux
- Back up your Windows files before attempting disk changes (dual-boot/install). Mistakes can cause data loss.
- Do not enable Secure Boot during install because Kali’s kernel is typically not signed for Secure Boot; disable it in UEFI if needed. Kali Linux
What you’ll need (hardware & software)
- A Windows 10 PC (administrator access).
- USB flash drive 16GB or larger (recommended: 32GB if you want persistence or want to keep extra files). Kali ISO itself may be >4GB for some images—16GB is safer. Kali Linux
- An internet connection to download the ISO and tools.
- Tools (Windows): Rufus (official site), optionally BalenaEtcher, and optionally Gpg4win/WSL if you want advanced GPG verification. Rufus+1
Full Step-by-Step Guide
Step 1—Choose the right Kali image and download it.
- Open the official Kali downloads page: https://www.kali.org/get-kali/ and pick the build you want (Installer, Live, NetInstaller, ARM, or “Everything” images). For most PCs, choose the Installer (64-bit) or the Live image if you want a portable USB. Kali Linux +1
- Click the ISO link and download the file (note the filename and where it’s saved).
Which image to pick?
- Installer—use this when you plan to install Kali onto the hard disk (full install).
- Live — run Kali from USB without touching the hard drive (can add persistence to save changes). Kali Linux
Step 2—Verify—run the ISO SHA256 checksum (don’t skip this!).
Why: Verification ensures the ISO you downloaded is exactly what Kali published—no corruption, no tampering. Kali provides SHA256SUMS and SHA256SUMS.gpg for cryptographic verification. Kali Linux
A—Quick checksum (Windows PowerShell or Command Prompt)
Open PowerShell (Run as Administrator) and run:
# PowerShell Get-FileHash -Path “C:\Users\You\Downloads\kali-linux-*.iso” -Algorithm SHA256
Or use certutil in CMD:
certutil -hashfile “C:\Users\You\Downloads\kali-linux-2025.x-amd64.iso” SHA256
Compare the printed SHA256 hash to the value in the SHA256SUMS file from Kali’s download page. If they match—good to go. If not, redownload from the official site. Kali Linux
B—(Recommended) Verify GPG signature (advanced, more secure)
Kali signs the SHA256SUMS with a GPG key. If you want the strongest verification:
- Download both SHA256SUMS and SHA256SUMS.gpg from the same Kali mirror (links on the Kali download page).
- Install Gpg4win on Windows or use WSL with gnupg.
- Import the Kali signing key (Kali docs show the public key and verification steps) and run:
# Example on Linux/WSL gpg –keyserver hkps://keys.openpgp.org –recv-keys <Kali-signing-key-id> gpg –verify SHA256SUMS.gpg SHA256SUMS
If GPG says “Good signature,” you can confidently compare the checksums and proceed. Kali’s docs show the exact commands and key IDs. Kali Linux
Step 3—Get Rufus (official) and prepare your USB.
- Download Rufus from the official site: https://rufus.ie/ (beware of fake sites). Rufus+1
- Either the portable version or the installer is fine. Run Rufus as administrator.
USB recommendations
- Minimum: 8 GB (some images may require 8+ GB); recommended 16 GB+ for persistence and comfort. Kali Linux
- Back up any data on the USB—Rufus will format and erase it.
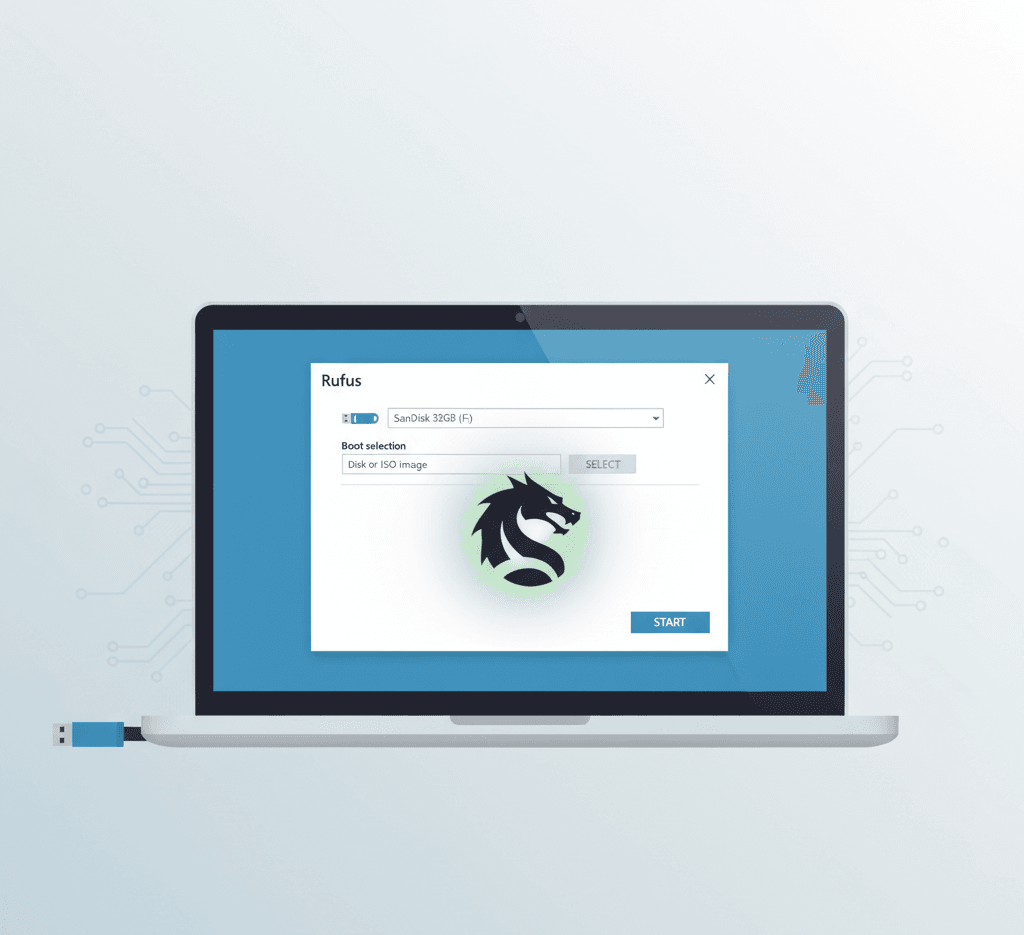
Step 4—Create the bootable USB using Rufus (Windows 10).
- Insert the USB drive into your Windows 10 PC.
- Open Rufus (it should detect the USB device automatically). Rufus
- Configure Rufus fields:
- Device: Select your USB drive.
- Boot selection: Click SELECT and choose the Kali ISO you downloaded.
- Image option: Leave as standard Windows installation is for Windows only—for Linux ISOs, you’ll see Write in ISO Image mode (Recommended) or choose DD image if required. (If the USB doesn’t boot, try DD Image mode.) Rufus
- Partition scheme:
- GPT → target machines with UEFI (modern laptops/desktops).
- MBR → legacy BIOS or CSM.
- Tip: If Windows is installed in UEFI mode and you wish to dual-boot, use GPT/UEFI to match Windows. Kali Linux
- Target system: Rufus will auto-select (UEFI or BIOS).
- File system: FAT32 is preferred for UEFI boot, but if the ISO contains files >4GB, Rufus may use the NTFS + UEFI: NTFS workaround. Let Rufus prompt you—accept defaults.
- Volume label: Optional (e.g., KALI_USB).
- Persistent partition (optional): If the Rufus version supports the persistence slider, you can set the size. Note: Rufus’s persistence slider works, but Kali docs say it may not work for all images (e.g., “Everything” ISO). For bulletproof persistence, follow Kali’s official persistence partition method after imaging. Kali Linux +1
- Click START. Rufus may ask to write in ISO or DD mode—choose ISO mode first (recommended). If Rufus warns about Syslinux/large files, follow prompts.
- Wait until Rufus finishes (progress bar). This can take several minutes.
If Rufus fails or you prefer alternatives, use BalenaEtcher (simple GUI) or Ventoy (for multi-ISO USBs). Both are valid tools—Ventoy is excellent if you plan to keep several ISOs on the same USB. (But always prefer official downloads.) Rufus
Step 5—(Optional) Make a Live USB with persistence
If you want a portable Kali that saves changes between reboots:
Two approaches:
- Rufus persistence slider (quick & easy)—set desired persistent size while flashing. Works often, but is not officially supported for every ISO per Kali docs. Kali Linux
- Official Kali persistence method (recommended, robust): Flash the ISO to USB, then create a new ext4 partition labelled “persistence” and add a persistence.conf file. Kali docs provide exact commands and steps. This method lets you create encrypted persistence as well. Kali Linux
If you want the robust route, follow Kali’s “Adding Persistence to a Kali Linux Live USB Drive” docs after step 4. Kali Linux
Step 6—Prepare the PC: BIOS/UEFI Settings & Secure Boot
- Enter UEFI/BIOS: Reboot PC and press the boot menu key (common keys: F12, F11, Esc) or BIOS setup keys (F2/Del). Keys vary by manufacturer.
- Disable Secure Boot (if present)—Kali’s kernel is not signed for Secure Boot and will be blocked. The official Kali installation docs explicitly recommend disabling Secure Boot before installing. Kali Linux
- Boot mode: Ensure the UEFI/Legacy mode matches the partition scheme you used in Rufus (GPT → UEFI).
- Set USB as the first boot device (optional)—or use the one-time boot menu to boot from USB.
Step 7—Boot from USB and choose how to run Kali.
Power on the target PC and choose the USB device from the boot menu. You will typically see the Kali boot menu with options like
- Live (forensic mode)
- Live (with persistence) (if you created persistence)
- Graphical install/Install (for full disk installation) Kali Linux
If you only want to try Kali, choose Live.
If you want to install Kali to disk, choose Graphical install (easier for most users).
Step 8 — Installing Kali to the hard disk (full install)—step highlights—Installing
If you plan to dual-boot with Windows, read the Dual Boot section below first. Kali Linux
During the graphical install, you’ll go through:
- Select language, location, and keyboard layout.
- Configure network (hostname, domain optional).
- Set up user account and password (Kali uses a non-root default user model now—you will create a standard privileged user during install). Kali Linux
- Partition disks:
- Guided—use the entire disk (wipes the disk).
- Guided—use the entire disk and set up LVM (if you prefer LVM).
- Manual—if you want to create custom partitions (/ swap, /home).
- Install the GRUB bootloader to the primary drive when prompted (required for boot).
- Finish installation and reboot—remove USB when prompted.
Important: If you choose “use entire disk,” Windows will be erased. If you want Windows and Kali side-by-side, follow the dual-boot steps below. Kali Linux
Step 9—Dual Boot Kali with Windows 10 (shrink Windows first)
High-level safe approach: Shrink the Windows partition from Windows, then install Kali in the free space.
- Back up Windows data first.
- Boot into Windows 10 → open Disk Management (diskmgmt.msc).
- Right-click the main partition (C:) → Shrink Volume → choose size to free for Kali (e.g., 50 GB+ for a comfortable install).
- Reboot and boot from the Kali USB. During the Kali installer, choose manual installation, partitioning, and use the free space to create partitions (/ 30–40GB, swap 2–4GB or use swapfile, /home rest). Kali Linux
UEFI note: If Windows is installed in UEFI mode, make sure you boot the installer in UEFI mode and install GRUB to the same EFI partition. This preserves Windows boot entries and allows GRUB to chainload Windows. Kali Linux
Step 10—After install: first boot and post-install setup
- Log in with the user you created during installation (Kali uses a non-root default; use sudo for admin tasks). Kali Linux
- Open a terminal and update packages:
sudo apt update sudo apt full-upgrade -y
- Install common extras if needed (e.g., sudo apt install -y kali-linux-default or specific tools).
- If you want the root account enabled (not recommended for daily use), read Kali docs on enabling root; otherwise, use sudo as normal. Kali Linux
Troubleshooting (common issues & fixes)
- USB won’t boot: Check UEFI settings (Secure Boot off), try selecting the USB from the boot menu, and try Rufus DD mode if ISO mode fails. Rufus
- Installer fails to detect disk: Is SATA mode AHCI? Is the disk encrypted? Check BIOS disk settings.
- Persistence not working: If you used the Rufus slider and the persistence option doesn’t appear, follow Kali’s official persistence partition method in the docs. Kali Linux
- GRUB doesn’t show Windows: Boot into Kali, and run sudo update-grub—it should detect Windows. If not, check EFI entries. Kali Linux
Useful commands you’ll use during/after install
- Check disk drives:
sudo fdisk -l lsblk
- Verify network:
ip a ping -c 3 google.com
- Update and upgrade:
sudo apt update && sudo apt full-upgrade -y
- Mount persistence partition (if manual):
sudo mkdir -p /mnt/my_usb_persistence sudo mount /dev/sdb3 /mnt/my_usb_persistence
Extra tips & best practices
- Use a fast USB 3.0 drive—it speeds up Live use and installation.
- Keep a separate backup USB with Windows recovery or a disk image before attempting partitioning.
- Prefer Installer ISO for full installs and Live for portable usage. Kali Linux
- For multi-ISO USBs or frequent testing, use Ventoy (it lets you copy ISO files onto USB and choose them at boot).
Quick reference links (official)
- Kali—Get Kali (official download): Kali Downloads. Kali Linux
- Kali—Download images securely & verify checksums: Kali docs (verifying images). Kali Linux
- Kali—Making a Kali Bootable USB Drive on Windows (official procedure + notes about Rufus): Kali USB docs. Kali Linux
- Kali—Installing and Dual Boot docs: Kali installation & dual-boot pages. Kali Linux +1
- Rufus (download official): rufus.ie. Rufus
- Kali—Persistence guide: Adding persistence official doc. Kali Linux
Final checklist before you start
- Official Kali ISO downloaded. Kali Linux
- SHA256 checksum verified (or GPG signature verified). Kali Linux
- Rufus was downloaded from the official site. Rufus
- USB (16GB+) backed up and ready. Kali Linux
- Windows backup done (if dual-booting).
- Secure Boot setting known (disable if required). Kali Linux
- 📚 References
Kali Linux Official Downloads – https://www.kali.org/get-kali/
Kali Documentation – Verifying ISO Images (Checksums & GPG) – https://www.kali.org/docs/introduction/download-images-securely/
Rufus Official Website (Bootable USB Tool) – https://rufus.ie/
Kali Documentation – Installing Kali Linux (Secure Boot Notes) – https://www.kali.org/docs/installation/hard-disk-install/
Kali Documentation – Dual Boot with Windows – https://www.kali.org/docs/installation/dual-boot/
Kali Documentation – Making a Kali Bootable USB Drive on Windows – https://www.kali.org/docs/usb/
Kali Documentation – Live Boot Options (Installer vs Live) – https://www.kali.org/docs/introduction/live-usb-install-with-persistence/
Kali Documentation – Adding Persistence to a Kali Linux Live USB Drive – https://www.kali.org/docs/usb/persistence/
Kali Linux Documentation – Default Non-Root User Model – https://www.kali.org/docs/policy/kali-linux-2020.1-root-policy/