How to Install Parrot Security OS Dual Boot with Windows 10/11 – Complete Step-by-Step Guide
Installing Parrot Security OS alongside Windows 10 or 11 is one of the best ways to enjoy both worlds — the stability and compatibility of Windows with the power, privacy, and penetration testing tools of Parrot OS. In this detailed, human-friendly guide, you’ll learn exactly how to install Parrot OS in a dual boot setup with Windows. This guide is written for beginners but thorough enough for anyone who wants a clean and professional installation without mistakes.
Introduction
Parrot Security OS is a Debian-based Linux distribution focused on security, forensics, and ethical hacking. It’s widely used by cybersecurity enthusiasts, ethical hackers, and privacy-conscious users who want a secure environment for penetration testing and secure development.
Dual-booting Parrot OS with Windows means that you can choose which operating system to load every time you start your computer. You keep all your Windows data and apps intact while gaining a full Linux environment with Parrot’s tools.
Let’s walk through the process carefully, one step at a time.
Step 1: Prepare Your Computer
Before doing anything, make sure your system meets the requirements and is properly backed up. A dual-boot setup modifies disk partitions and the bootloader, so a complete backup is essential.
Minimum Requirements:
- 64-bit processor (x86_64)
- 2 GB RAM (4 GB or more recommended)
- 20 GB minimum free space (40 GB or more ideal)
- Stable internet connection
- USB flash drive (8 GB or larger)
Backup Everything:
Copy all important data to an external drive or cloud storage. Even if installation rarely fails, it’s not worth the risk of losing files.
Disable Fast Startup and Hibernation:
Windows Fast Startup locks the disk and can cause errors during Linux installation.
- Open Control Panel → Power Options.
- Click “Choose what the power buttons do.”
- Uncheck “Turn on fast startup.”
- Open Command Prompt as administrator and type:
powercfg /h offThis disables hibernation.
Step 2: Create Free Space for Parrot OS
You need to create unallocated space on your hard drive for Parrot OS.
- Right-click on the Start menu and choose Disk Management.
- Find your main drive (usually C:).
- Right-click it and select Shrink Volume.
- Shrink by at least 40,000 MB (40 GB) or more.
- When done, you’ll see unallocated space on the disk. Leave it as it is; don’t format it yet.
This unallocated space will be used later for Parrot’s root and swap partitions.
Step 3: Download Parrot Security OS
Go to the official Parrot OS website and download the latest Parrot Security Edition ISO. Always download from the official site to avoid corrupted or tampered files.
After downloading, verify the file’s integrity by checking its SHA256 hash. On Windows, open PowerShell and run:
Get-FileHash -Algorithm SHA256 parrot-security.iso
Compare it with the checksum provided on the Parrot website. If it matches, you’re good to go.
Step 4: Create a Bootable USB Drive
You’ll need a bootable USB to install Parrot. On Windows, the easiest tool is Rufus.
- Download and open Rufus.
- Insert your USB drive (8 GB or more).
- Under Device, select your USB.
- Under Boot selection, choose the Parrot ISO you downloaded.
- For Partition scheme:
- Choose GPT if your Windows uses UEFI (most modern PCs).
- Choose MBR if your Windows uses Legacy BIOS.
- File system: FAT32.
- Click Start and wait for Rufus to finish writing the image.
Once done, safely eject the USB.
Step 5: Configure BIOS/UEFI Settings
Before installing, you may need to adjust some firmware settings.
- Restart your PC and enter BIOS/UEFI (press F2, F10, F12, or Del during boot).
- Disable Secure Boot (if it prevents booting the USB).
- Disable Fast Boot or Quick Boot options.
- Set USB as the first boot device, or simply press the boot menu key (usually F12) when starting up.
Save changes and exit. Insert the Parrot USB and reboot.
Step 6: Boot from USB and Start the Installer
When your system boots from the USB, you’ll see the Parrot OS Boot Menu.
Choose Try/Install Parrot OS and press Enter.
After loading, you’ll arrive at the Parrot live desktop. From here, double-click the Install Parrot icon on the desktop to begin installation.
Step 7: Begin the Installation Process
The installer (Calamares) will guide you through a series of screens.
- Language – Choose your preferred language and click Next.
- Location – Select your region/time zone.
- Keyboard – Choose your keyboard layout.
- Partitions – This is the most important step.
Step 8: Partitioning for Dual Boot
You have two options:
- Automatic (Install alongside Windows)
- Manual partitioning
If the automatic option is available, choose Install alongside Windows 10/11, and Parrot will automatically create partitions in the unallocated space. This is the easiest method for beginners.
If not, choose Manual Partitioning and create the following partitions:
- Root ( / )
- Size: at least 25 GB
- Format: ext4
- Mount point:
/
- Swap (optional)
- Size: 2 GB (or equal to RAM if RAM < 4 GB)
- Use as: swap area
Make sure not to delete or format your Windows partition. Double-check everything before continuing.
When ready, click Next.
Step 9: Install the Bootloader (GRUB)
The installer will ask where to install the bootloader.
Choose the EFI partition (usually /dev/sda or the disk where Windows is installed).
GRUB is the menu that lets you choose between Windows and Parrot each time you start the computer. Installing GRUB correctly ensures both systems can boot.
Click Install Now and confirm your choices. The installation will begin.
Step 10: Installation Process
Parrot will now copy files and configure your system. This may take 10–20 minutes depending on your system speed.
Once finished, it will show Installation Complete. Remove the USB drive when prompted, then click Restart Now.
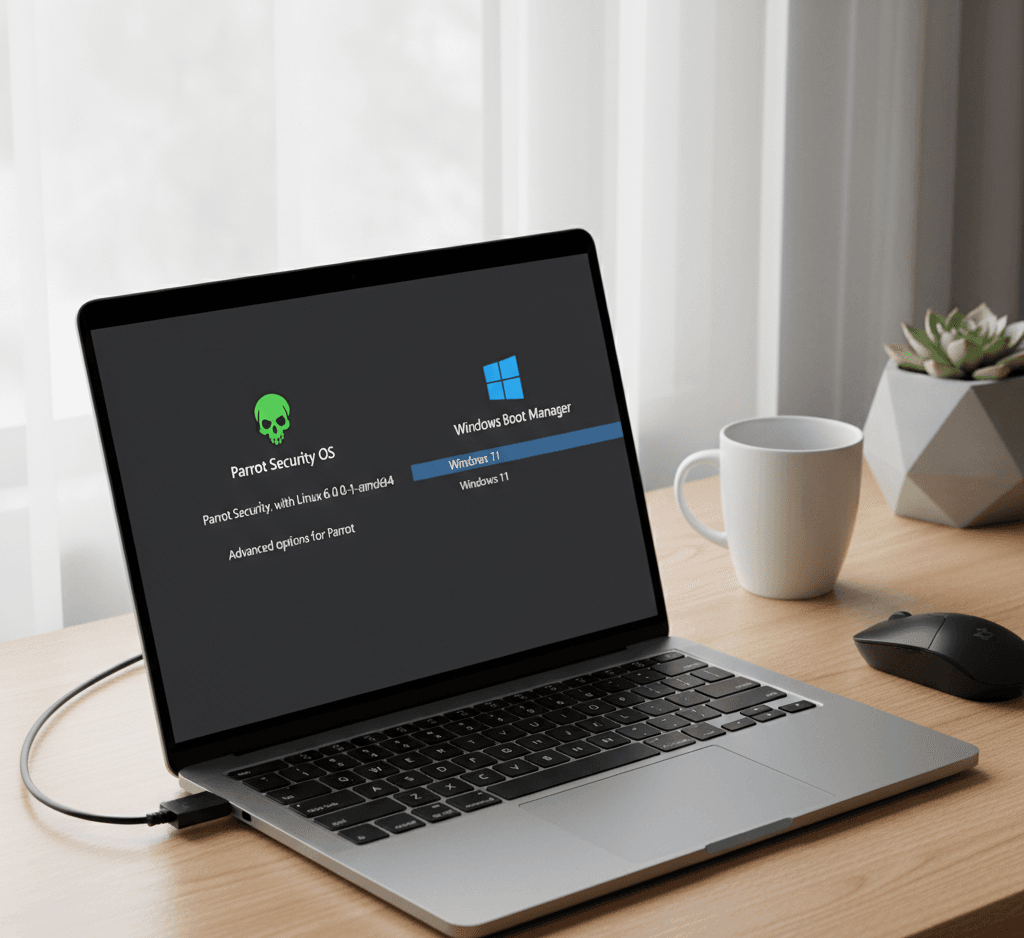
Step 11: Boot Menu (GRUB)
After reboot, you’ll see the GRUB menu with options like:
- Parrot GNU/Linux
- Advanced options for Parrot
- Windows Boot Manager
Use the arrow keys to select which operating system you want to load.
If you don’t select anything, Parrot OS will boot by default after a few seconds.
Step 12: First Boot into Parrot OS
When you boot into Parrot for the first time:
- Enter your username and password (created during installation).
- Wait for the desktop to load.
- Run updates immediately:
sudo parrot-upgradeThis updates all packages and ensures security tools are current.
You now have a fully functional Parrot Security OS running alongside Windows.
Step 13: Switching Between Parrot and Windows
Whenever you reboot your computer, GRUB will appear. Use the arrows to choose Windows or Parrot. If you ever want to change the default boot order or time delay, you can do so from Parrot using:
sudo nano /etc/default/grub
Change the GRUB_DEFAULT line and update GRUB:
sudo update-grub
Step 14: Common Issues and Fixes
1. Windows Doesn’t Appear in GRUB:
Boot into Parrot and run:
sudo update-grub
It will detect Windows automatically and add it to the menu.
2. System Boots Directly into Windows:
Enter BIOS and ensure the boot order puts “Parrot” or “GRUB” first.
If GRUB is missing, you may need to repair it from a Parrot live USB using Boot Repair or chroot commands.
3. No Wi-Fi or Drivers Missing:
Run updates, or install firmware packages:
sudo apt install firmware-linux-nonfree
4. Secure Boot Prevents Booting:
Disable Secure Boot from BIOS. Parrot uses unsigned bootloaders which can conflict with Secure Boot.
Step 15: Post-Installation Setup
After your dual boot is running smoothly, spend some time optimizing both systems.
For Parrot:
- Update the system regularly.
- Explore the built-in tools (Metasploit, Burp Suite, Wireshark).
- Create a restore point using Timeshift.
- Set up a strong password and enable a firewall.
For Windows:
- Use Windows Defender or antivirus as usual.
- Avoid accessing Windows files from Parrot frequently to prevent accidental corruption.
- Keep backups up to date.
Step 16: How to Remove Parrot OS (If Needed)
If someday you want to remove Parrot:
- Boot into Windows.
- Delete the Parrot partitions from Disk Management.
- Restore the Windows bootloader using:
bootrec /fixmbr bootrec /fixboot - Reboot, and Windows will load normally again.
Step 17: Tips for Smooth Dual Booting
- Always shut down Parrot before booting into Windows and vice versa (avoid hibernation).
- Do not modify NTFS partitions from Linux unless absolutely necessary.
- Keep your Parrot USB handy for repairs or GRUB reinstallation.
- Regularly check for BIOS updates, especially if boot issues appear after Windows updates.
Conclusion
Dual booting Parrot Security OS with Windows 10 or 11 gives you flexibility, security, and learning opportunities — the best of both operating systems. With Windows, you have all your productivity and entertainment tools, and with Parrot, you get a powerful penetration testing and privacy-focused environment.
By following the steps above — backing up your data, preparing partitions, creating a bootable USB, and carefully installing Parrot — you can achieve a stable and secure dual-boot setup without losing any Windows data.
Once set up, you can switch between systems easily, explore Parrot’s vast security toolkit, and enjoy the world of Linux alongside your familiar Windows workspace.
Your computer is now a complete workstation for both everyday use and cybersecurity exploration.
References
- Parrot OS Official Website – Official downloads, editions, and documentation.
🔗 https://www.parrotsec.org/ - Parrot OS Documentation – Official install guide, security info, and advanced setup instructions.
🔗 https://docs.parrotsec.org/ - Parrot OS GitHub Repository – Source code, changelogs, and community contributions.
🔗 https://github.com/ParrotSec/ - GNU GRUB Manual – Information about the GRUB bootloader used in dual boot setups.
🔗 https://www.gnu.org/software/grub/manual/ - Rufus Official Website – Tool used for creating bootable USB drives.
🔗 https://rufus.ie/ - Microsoft Windows 10/11 Disk Management Guide – How to shrink partitions safely in Windows.
🔗 https://support.microsoft.com/en-us/windows/create-and-format-a-hard-disk-partition- - BalenaEtcher – Alternative open-source tool for creating bootable media.
🔗 https://etcher.balena.io/ - Debian Wiki – Dual Boot Setup – General Linux and Windows dual booting information.
🔗 https://wiki.debian.org/DualBoot - Linux Foundation – Understanding UEFI and Secure Boot
🔗 https://wiki.linuxfoundation.org/realtime/documentation/secureboot - Boot Repair Tool (Ubuntu Community Help Wiki) – For fixing GRUB or bootloader issues if needed.
🔗 https://help.ubuntu.com/community/Boot-Repair